Eliminate the Fuel Rail
The stock fuel rail is pretty ugly. Here's how to eliminate it.
This is a great modification but it's intended for cars where the mechanical pump has been replaced by an electric version. If you're interest in making that swap, I put together a great procedure and click here to see how it's done.
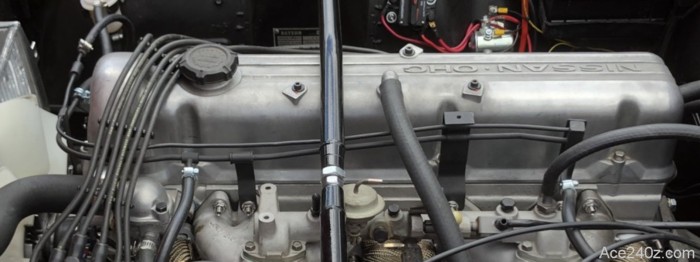 I think the stock fuel system is incredibly ugly.
There are steel lines that come from the fuel tank and alongside the passenger side frame rail to the front of the engine, where the mechanical pump is located. Rubber hoses connect to the pump with a filter in the middle. A rubber hose from the pump connects to a steel "rail" that wraps around the valve cover, feeds the carbs, then makes a u-turn and goes beneath the supply rail, back around the valve cover to a rubber hose that connects to a steel return line all the way back to the tank.
Whew.
I think the stock fuel system is incredibly ugly.
There are steel lines that come from the fuel tank and alongside the passenger side frame rail to the front of the engine, where the mechanical pump is located. Rubber hoses connect to the pump with a filter in the middle. A rubber hose from the pump connects to a steel "rail" that wraps around the valve cover, feeds the carbs, then makes a u-turn and goes beneath the supply rail, back around the valve cover to a rubber hose that connects to a steel return line all the way back to the tank.
Whew.
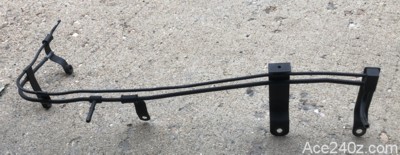 My rail was in bad shape after 52 years and a stock replacement is waaaay too expensive.
I did my best to gently straighten it out but was afraid of breaking or crimping the tubes. The way the thing is built made it pretty much impossible to do. My temporary solution years ago was to paint it flat black in a failed attempt to hide it.
My rail was in bad shape after 52 years and a stock replacement is waaaay too expensive.
I did my best to gently straighten it out but was afraid of breaking or crimping the tubes. The way the thing is built made it pretty much impossible to do. My temporary solution years ago was to paint it flat black in a failed attempt to hide it.
 I should explain this project began when the steel supply line somehow got bent and crimped. It was open enough to allow enough fuel to the carbs while driving around town but on the highway it couldn't keep up with demand and the bowls would empty and the engine would die.
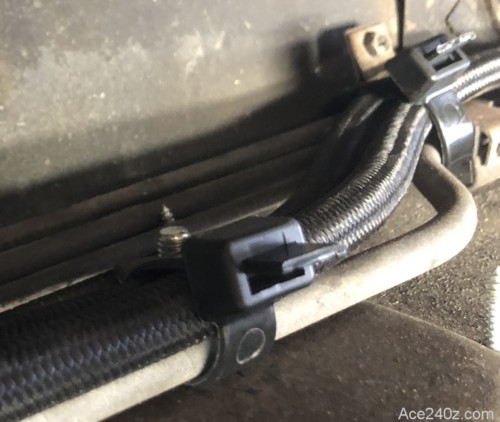
The obvious solution would be to replace the steel lines but that would be expensive and horribly time consuming. My solution was buying 20 feet of heavy-duty braided hose and some AN fittings and using it to bypass the lines completely. I used extra-wide zip ties to secure it inside the transmission tunnel. That fixed the problem in a couple of hours and I'm pretty confident it's rugged enough to withstand any sort of road debris.
Those hoses terminate at the firewill Since I had already replaced the mechanical pump with an electric version, there was no reason for fuel to go all the way to the front of the engine. I could run hoses right up the firewall and over to the engine. It was an opportunity I couldn't ignore.
Before you do anything, keep in mind that gasoline is extremely flammible . You don't want to watch your car burn to the ground because gasoline leaked onto the exhaust manifold and caught fire. If you've never worked with a fuel system before, you might want to ask a friend to help or maybe do this modification after you've gained a little experience working on other things.
I should explain this project began when the steel supply line somehow got bent and crimped. It was open enough to allow enough fuel to the carbs while driving around town but on the highway it couldn't keep up with demand and the bowls would empty and the engine would die.
The obvious solution would be to replace the steel lines but that would be expensive and horribly time consuming. My solution was buying 20 feet of heavy-duty braided hose and some AN fittings and using it to bypass the lines completely. I used extra-wide zip ties to secure it inside the transmission tunnel. That fixed the problem in a couple of hours and I'm pretty confident it's rugged enough to withstand any sort of road debris.
Those hoses terminate at the firewill Since I had already replaced the mechanical pump with an electric version, there was no reason for fuel to go all the way to the front of the engine. I could run hoses right up the firewall and over to the engine. It was an opportunity I couldn't ignore.
Before you do anything, keep in mind that gasoline is extremely flammible . You don't want to watch your car burn to the ground because gasoline leaked onto the exhaust manifold and caught fire. If you've never worked with a fuel system before, you might want to ask a friend to help or maybe do this modification after you've gained a little experience working on other things.
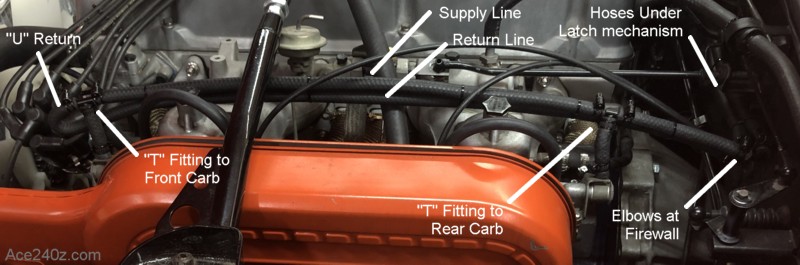
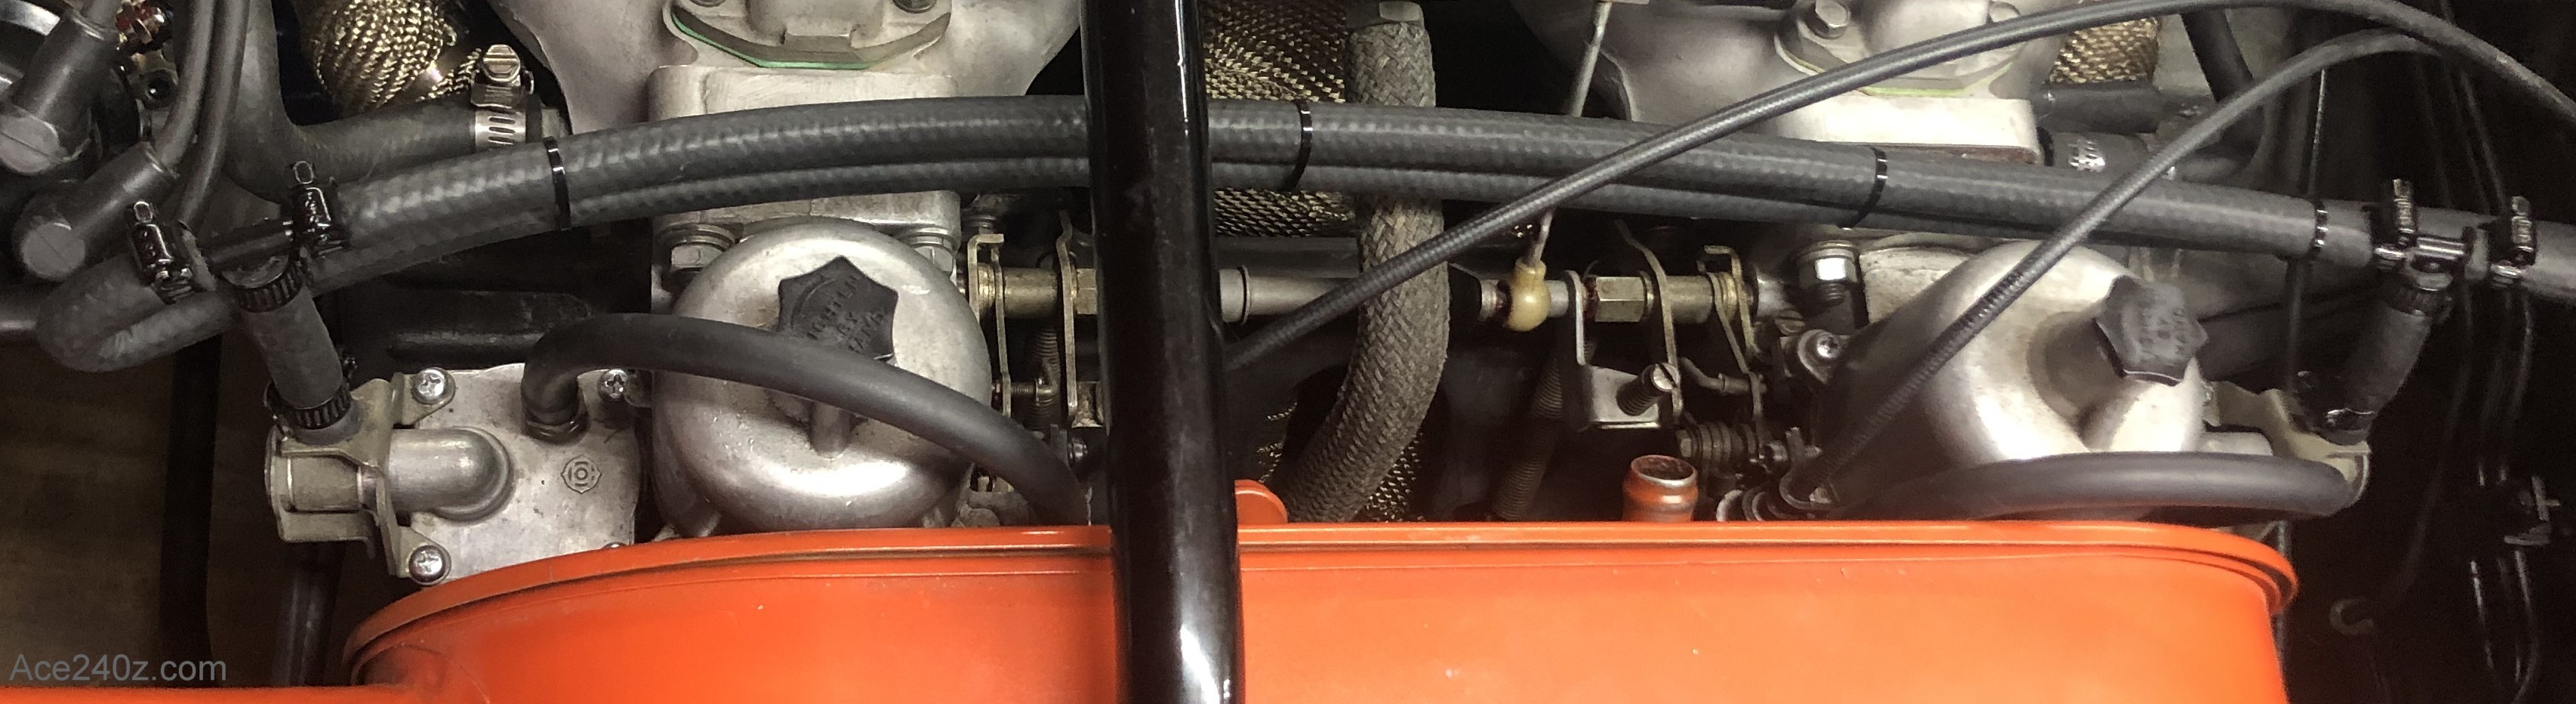 Here's how the new system looks. Click on the photo to see a larger version.
I originally intended to use braided hoses and AN fittings to the carbs, which would look great but it's overkill for a system with a mere 2-3 psi. The cheapest AN fittings I could find were about $8 each, which made it horribly expensive. I opted for ordinary rubber hose and screw clamps.
I scoured the internet for fittings. Most of what I found were plastic (which wouldn't work) or brass (which is ugly). Some of steel or aluminum ones were nearly the price of the AN vesions. Then I came across a site for a company which make parts for bars and brewers. Not only did their stainless steel fittings look great, the prices were incredibly cheap.
Here's a link to their website page for the fittings: Installation Parts Supply
This is what you'll need from them: one "U", two "T", five elbows and 20 hose clamps. They have a minimum order amount (I think it's $25) so perhaps get another "U" and another "T" in case you mess one up when cutting, and maybe a couple more elbows. With their cheap prices, it can't hurt to have a few spares.
You'll need about 20 feet of ordinary 3/16" fuel hose, which you can buy at your local auto parts store. It doesn't need to be the expensive fuel injection type.
You'll also need some 1/2" conduit clamps, sheet metal screws, washers and a handful of zip-ties, all of which you can get at your local hardware store.
Here's how the new system looks. Click on the photo to see a larger version.
I originally intended to use braided hoses and AN fittings to the carbs, which would look great but it's overkill for a system with a mere 2-3 psi. The cheapest AN fittings I could find were about $8 each, which made it horribly expensive. I opted for ordinary rubber hose and screw clamps.
I scoured the internet for fittings. Most of what I found were plastic (which wouldn't work) or brass (which is ugly). Some of steel or aluminum ones were nearly the price of the AN vesions. Then I came across a site for a company which make parts for bars and brewers. Not only did their stainless steel fittings look great, the prices were incredibly cheap.
Here's a link to their website page for the fittings: Installation Parts Supply
This is what you'll need from them: one "U", two "T", five elbows and 20 hose clamps. They have a minimum order amount (I think it's $25) so perhaps get another "U" and another "T" in case you mess one up when cutting, and maybe a couple more elbows. With their cheap prices, it can't hurt to have a few spares.
You'll need about 20 feet of ordinary 3/16" fuel hose, which you can buy at your local auto parts store. It doesn't need to be the expensive fuel injection type.
You'll also need some 1/2" conduit clamps, sheet metal screws, washers and a handful of zip-ties, all of which you can get at your local hardware store.
Start by giving the engine bay a good cleaning, then take a lot of pics of the existing fuel system from different angles. Disconnect the battery. It's always good to do whenever you're working on anything involving gasoline. One spark can ruin a good day. Jack up the rear of the car and take off the passenger side wheel. You'll be able to stretch your arm in far enough to put a clamp on the supply and return hoses to prevent gas from leaking out up front. Disconnect all of the hoses going to the fuel rail, then remove it. Remove the stock fuel filter and bracket. You can reuse the filter, which is what I did, or upgrade to an inline version. Depending on the condition of your fuel rail, you might be able to sell it on eBay.
 There are two hoses - one for the fuel supply and one to return the excess fuel to the tank. Because of that, the hoses need a connection and a "U" does the trick.
However, if you connect it the way the pieces are made, it sticks out too far and to me looks awkward.
There are two hoses - one for the fuel supply and one to return the excess fuel to the tank. Because of that, the hoses need a connection and a "U" does the trick.
However, if you connect it the way the pieces are made, it sticks out too far and to me looks awkward.
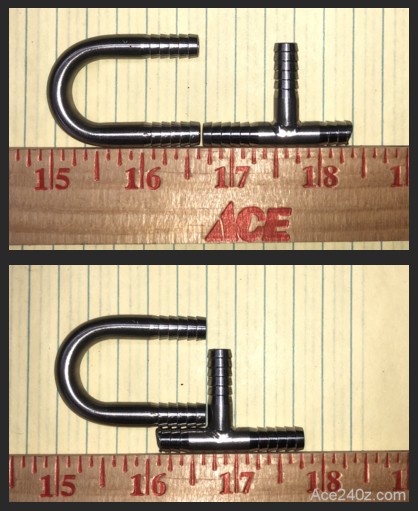 My solution was to cut a little off one end of the "U" and one side of the "T". Looking at the photo you can see I shortened the connection by nearly 3/4" of an inch.
Stainless steel is a little difficult to cut, even with a Sawzall, but I think it's worth it. Deburr the edges and wash them out.
My solution was to cut a little off one end of the "U" and one side of the "T". Looking at the photo you can see I shortened the connection by nearly 3/4" of an inch.
Stainless steel is a little difficult to cut, even with a Sawzall, but I think it's worth it. Deburr the edges and wash them out.
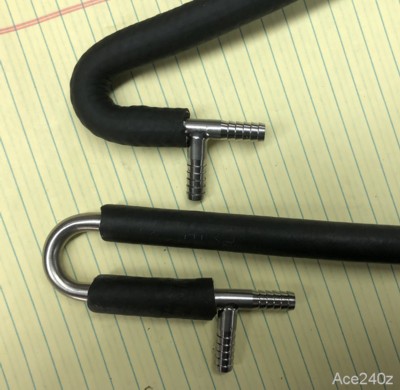 Start assembling at the front of the engine. If you connect everything as shown at the bottom of this photo, you'll see that the "U" fitting is exposed and three clamps will be needed to connect everything.
I wanted to cover the exposed part of the "U" fitting. With the help of a heat gun to soften the rubber, and a liberal amount of oil as a lubricant, I was able to force the hose completely over the "U". Push it far enough to leave the end of the hose about 2" past the end of the fitting. With some careful trimming, you can slide that hose over the end of the "T" without any gap inside.
As you see in the top of the photo, the shiny tube is hidden and only one clamp is needed.
Start assembling at the front of the engine. If you connect everything as shown at the bottom of this photo, you'll see that the "U" fitting is exposed and three clamps will be needed to connect everything.
I wanted to cover the exposed part of the "U" fitting. With the help of a heat gun to soften the rubber, and a liberal amount of oil as a lubricant, I was able to force the hose completely over the "U". Push it far enough to leave the end of the hose about 2" past the end of the fitting. With some careful trimming, you can slide that hose over the end of the "T" without any gap inside.
As you see in the top of the photo, the shiny tube is hidden and only one clamp is needed.
 Here are a couple of neat tricks.
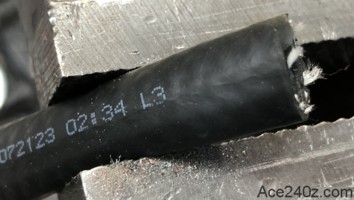
Hoses come with some printing to identify the type, the size, the manufacturer, and so on. A little bit of steel wool and rubbing alcohol easily removes the text, leaving it clean and bare.
When you cut the hose, you'll see little strings poking out. They're part of the webbing inside to give it additional strength. A little dab with a black marker makes them disappear.
Those tricks, tiny as they are, contribute to a better-looking assembly. Most people won't notice but the next time you see someone else's engine, you'll realize a couple minutes of effort make a difference.
Here are a couple of neat tricks.
Hoses come with some printing to identify the type, the size, the manufacturer, and so on. A little bit of steel wool and rubbing alcohol easily removes the text, leaving it clean and bare.
When you cut the hose, you'll see little strings poking out. They're part of the webbing inside to give it additional strength. A little dab with a black marker makes them disappear.
Those tricks, tiny as they are, contribute to a better-looking assembly. Most people won't notice but the next time you see someone else's engine, you'll realize a couple minutes of effort make a difference.
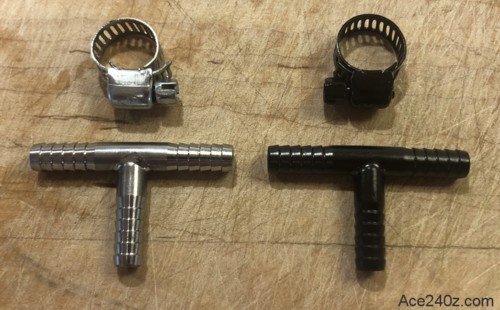 You can leave the stainless steel fittings bare, which looks pretty good and shows you used quality pieces, or you can do like me and paint them black to help them "hide" in the finished assembly.
Originally I was going to use the stainless clamps that came with the fittings. They really stand out, especially if you keep the fittings bare but I opted for black ones I found online. They'll virtually disappear when the job is done.
At this point, take the conduit clips and paint them black. Doing it now will give the paint time to dry by the time you'll need them. I like to paint the screws and washers to match. It's yet-another "little thing" to make everything look finished.
You can leave the stainless steel fittings bare, which looks pretty good and shows you used quality pieces, or you can do like me and paint them black to help them "hide" in the finished assembly.
Originally I was going to use the stainless clamps that came with the fittings. They really stand out, especially if you keep the fittings bare but I opted for black ones I found online. They'll virtually disappear when the job is done.
At this point, take the conduit clips and paint them black. Doing it now will give the paint time to dry by the time you'll need them. I like to paint the screws and washers to match. It's yet-another "little thing" to make everything look finished.
 Start at the front carbs and move backwards.
Cut a short piece of hose to connect the carb's inlet to the bottom of "T". Leave the clamps a little loose to make adjustments easy.
Next take the hose with the "U" inside and attach it to the "T".
Guide the rest of that hose back to the firewall. It'll be the return line. Making sure the hose from the carb points straight up, cut the end where it meets the firewall and leave a couple of inches extra.
Cut another short piece of hose for the rear carb and attach it to another "T". Cut a piece of hose to connect the "T" fittings together. Make sure the hoses connected to the carbs are still straight up.
Cut a piece of hose to run from the "T" to the firewall. It'll be the supply line. Carefully cut the end of the hose to slip over an elbow, with the elbow just touching the firewall.
Attach the return hose to the supply hose with zip-ties about 4" apart. Leave the ties a little loose at the moment.
Like you did with the supply line, carefully cut the end of the hose to slip over an elbow, with the elbow just touching the firewall.
At this point, the main part of the new supply system is finished.
Start at the front carbs and move backwards.
Cut a short piece of hose to connect the carb's inlet to the bottom of "T". Leave the clamps a little loose to make adjustments easy.
Next take the hose with the "U" inside and attach it to the "T".
Guide the rest of that hose back to the firewall. It'll be the return line. Making sure the hose from the carb points straight up, cut the end where it meets the firewall and leave a couple of inches extra.
Cut another short piece of hose for the rear carb and attach it to another "T". Cut a piece of hose to connect the "T" fittings together. Make sure the hoses connected to the carbs are still straight up.
Cut a piece of hose to run from the "T" to the firewall. It'll be the supply line. Carefully cut the end of the hose to slip over an elbow, with the elbow just touching the firewall.
Attach the return hose to the supply hose with zip-ties about 4" apart. Leave the ties a little loose at the moment.
Like you did with the supply line, carefully cut the end of the hose to slip over an elbow, with the elbow just touching the firewall.
At this point, the main part of the new supply system is finished.
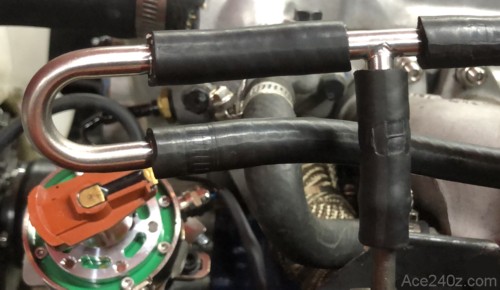
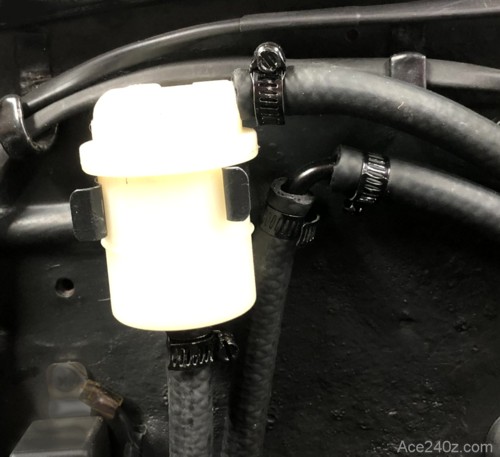
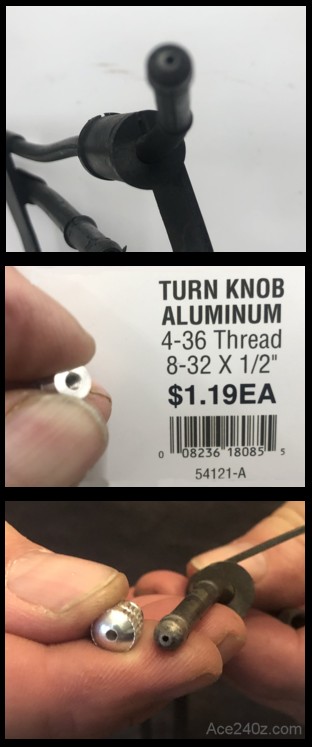 Here's a small, but very important part. With the stock fuel rail there's a "restrictor" for the return line. It helps maintain the fuel pressure to ensure the carbs will stay filled.
You can cut that part off the fuel rail, but there's a cheap alternative. At the local Ace Hardware I found these little "turn knobs". They're used for old-style table lamps with a rotating stem to turn the lamp on and off. The price was certain good.
One end is threaded to fit over the stem. The other end is closed. I used a 1/32" drill to make a tiny hole thru the closed end. It's a tiny bit larger than the hole on the fuel rail, but not enough to make a difference.
Pull the return hose off the elbow and stick the turn knob inside. It's a perfect fit. Use a small screwdriver to push it a few inches inside, then reconnect the hose to the elbow.
Here's a small, but very important part. With the stock fuel rail there's a "restrictor" for the return line. It helps maintain the fuel pressure to ensure the carbs will stay filled.
You can cut that part off the fuel rail, but there's a cheap alternative. At the local Ace Hardware I found these little "turn knobs". They're used for old-style table lamps with a rotating stem to turn the lamp on and off. The price was certain good.
One end is threaded to fit over the stem. The other end is closed. I used a 1/32" drill to make a tiny hole thru the closed end. It's a tiny bit larger than the hole on the fuel rail, but not enough to make a difference.
Pull the return hose off the elbow and stick the turn knob inside. It's a perfect fit. Use a small screwdriver to push it a few inches inside, then reconnect the hose to the elbow.
 Here's where you have to decide it you want to keep the stock filter or an aftermarket type. I'm showing how to reuse the stock filter because that's what I did but the procedure is pretty much the same for both.
I picked a spot about 6" away from the battery and high enough that when you connect it to the hose leading to the carbs, it's at the same level. I drilled a little hole and used a sheet metal screw to hold the bracket in place.
Attach the end of the hose to the supply line elbow on the firewall. Use a conduit clamp to hold it in place.
Route the hose below the hood latch mechanism and secure it with a couple more conduit clamps. Cut the end of the hose to connect it to the filter.
At the return line elbow, attach another hose and also route it below the latch mechanism. Use zip-ties about 6" apart to attach the two hoses. Where that hose meets the filter, cut it a little short and attach it to an elbow pointing straight down.
Here's where you have to decide it you want to keep the stock filter or an aftermarket type. I'm showing how to reuse the stock filter because that's what I did but the procedure is pretty much the same for both.
I picked a spot about 6" away from the battery and high enough that when you connect it to the hose leading to the carbs, it's at the same level. I drilled a little hole and used a sheet metal screw to hold the bracket in place.
Attach the end of the hose to the supply line elbow on the firewall. Use a conduit clamp to hold it in place.
Route the hose below the hood latch mechanism and secure it with a couple more conduit clamps. Cut the end of the hose to connect it to the filter.
At the return line elbow, attach another hose and also route it below the latch mechanism. Use zip-ties about 6" apart to attach the two hoses. Where that hose meets the filter, cut it a little short and attach it to an elbow pointing straight down.
Unfortunately, I don't have a photo for this part. Where the stock fuel lines end, at the front of the engine, use short pieces of rubber hose to add a pair of elbows facing back toward the firewall. The steel hose for the return line is slightly smaller in diameter than the supply line, so take a little extra time with the clamp to make certain the hose won't leak. Take one piece of hose, connect it to the supply line, then route it along the frame rail and up the firewall and connect it to the filter. Use conduit clips to secure it to the frame rail and the firewall. Connect the remaining hose to the return elbow and route it next to the supply hose, then up to the return elbow next to the filter. Uze zip-ties every few inches to attach the hoses to each other. At this point, the new system is finished. Make some final adjustments and tweaks to make sure it looks nice and neat, then tighten all of the clamps. Note: there's an option for the above. Instead of running the hoses forward to the end of the steel lines, you can carefully cut the steel lines at the firewall and attach the new hoses there. It's a little tricky to cut the steel lines but it makes for a cleaner installation. Just make sure the ends are deburred and any little scraps of metal are flushed away.
Here's the moment of truth - will it work? Reach back to the full tank and take off the clamps for the fuel lines. Put the wheel back on and lower the car. Connect the battery and run the pump. You should see fuel fill up the filter. If you don't, turn off the pump and check the supply connections. Check every connection again for leaks. Make triple-certain that everything is tight. Even just a drop of gasoline "here or there" can lead to a fire and a major disaster and maybe even kill you. Don't take any chances. If you've done everything right, the engine will start right up. Congratulations. You now have a custom fuel supply and the ugly fuel rail is gone. The engine bay looks neater and other Z owners will envy you. Go for a drive. When you get home from the drive, check the connections again.